French Wing Back

I've got the tree up, the gifts bought, and the plans made.  Christmas is fast approaching and my little darlings are so excited.  I asked my 5 year old "What is Christmas?"  And she said "Lights!"

I love that her first response wasn't "presents!"  But then we discussed what we believe to be true about what Christmas really means and why we celebrate it.

My Christmas present to myself, was to get this chair completed before the big day.  It's been an ongoing project for whenever I had free time.  So you can guess that it's taken me....awhile.  For those of you who don't know I've got 3 kids 5 and under.


I'd been wanting one of these French wing backs for awhile now.  And I came across this one for $10, so into the car she went.


I ran out of trim for the back, so I used some left over nail head trim from this bench.

This has been only my second attempt at making a cushion cover.  I'm self taught, so let's just say thank God I wasn't born a perfectionist.
I may not be posting for the next couple of weeks, so I hope you all have a

HAPPY HOLIDAY!

Classic, budget friendly Christmas decor.

Every year I spend next to nothing on my Christmas decorations.  In order to do this well, I keep a few tips in mind.

Tip #1: Shop at thrift stores.
You can score some pretty decent Christmas decor at the thrift store.  Around Christmas time go to your local thrift store, and you'll see what I mean. People seem to get new decor and give away their old stuff.  I got this pre-lit garland for $2.


Tip #2-  Use natural resources.
  Look around your neighborhood or local forests, depending on what part of the country you live in you can find some evergreen trees and snip some branches for free. I also brought in some pine cones from my back yard.
I used clippings from a large evergreen to make my staircase garland.  The boxwood wreath was $10 from Trader Joe's


Tip #3- Invest in a few key pieces and use them every year.
I've had this grapevine wreath for 3 years now.  I use it for my fall wreath and Christmas wreath.  Just change out the leaves and greenery every year.  This wreath was made with my clippings. 


Tip #4- Keep it simple.
I don't over do my decor. Setting it up is fun, but taking it down can be a pain.  I can just toss all the greenery in the trash or compost heap and stash the garland and wreath parts on the attic.  Takes me about 15 min.


I hope you all have a wonderful holiday season!

Bedside dresser


One of my favorite things about cooler weather, is putting flannel sheets on the bed.  Something about flannel just makes the world a better place.

It has taken me a long while to finally find a color I wanted to paint this dresser for my husband's side of the bed.  But when Jenna Sue posted her living room reveal and showed this great little piece she built, I new that was the color I wanted.

The color is mountain smoke by Valspar.


In my excitement to get this all done in a matter of 2 days, I forgot to take a before, but it looked almost identical to this one. 


I hope you all have a great weekend, my birthday is Sunday!  My mom is taking me shopping, the girls are spending the night out and I get to read my book! 
Looking forward to another great year.

Fall Wreath

This time of year, that intermediate part where you can physically feel the seasons changing, is my absolute favorite.  I love that I can wear shorts or jeans and be comfortable in either.

The leaves in my neighborhood are just starting to change, and I scrounged around in my yard for vibrant leaves to use in my wreath.

I'm a huge fan of using what I already have to make something new.  It gives me a gratifying sense of accomplishment, when I don't have to spend any money.


 I used a grapevine wreath from Joann I bought last year, along with some fake berry accessories.
Then I simply added real leaves that I found around my yard.  I tucked them all in around the wreath.  Took me all of 10-15 minutes.


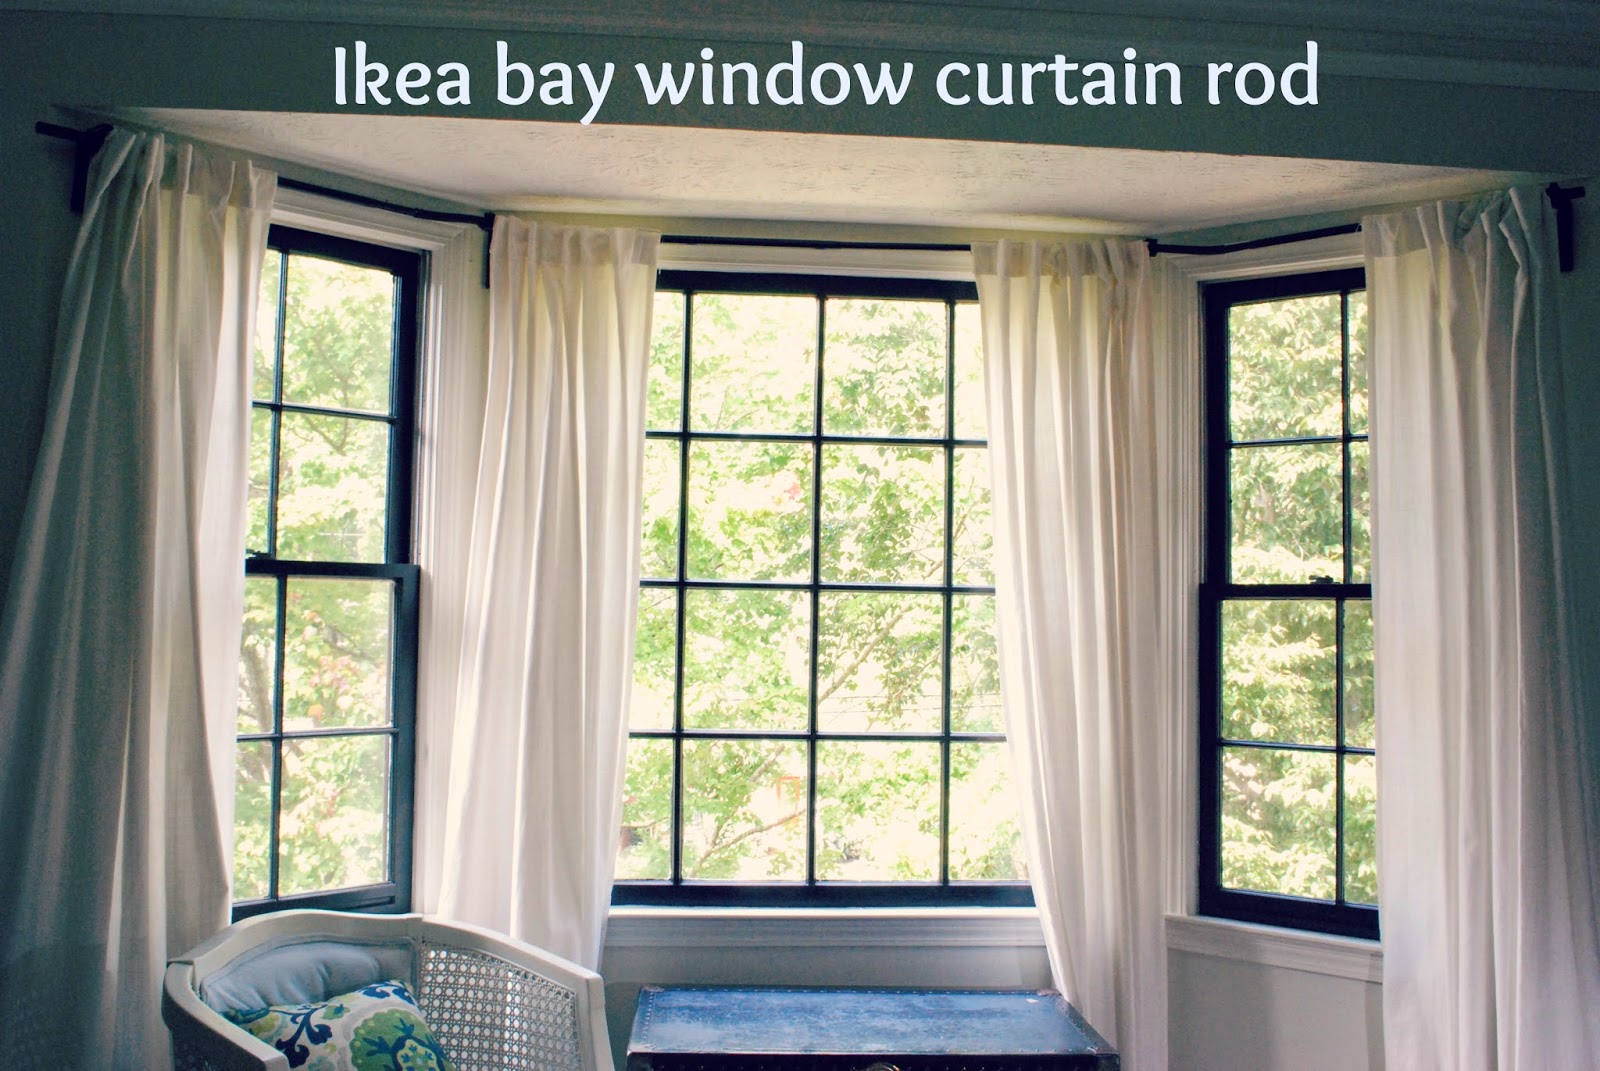
Bay window curtain rod


If you have a bay window, then you may empathize with me.  Those curtain rods are crazy expensive!  I have a total of three bay windows in my house.  When we first moved in I looked everywhere for an inexpensive rod, there were none to be found.  So I resorted to using a swing type rod and made do.

Over the next few years, every time I stopped by certain stores I would look to see if there were any rods on sale.  No luck.

I used Pinterest to search DIY rods, and found a good one where they used a bendable metal pipe.  I got one and tried it out.  Then put it in the basement and forgot about it.

Finally, I came across a blog (don't remember which one) that showed how you can use a bendable curtain rod from Ikea to make a bay window rod.


Here is what you will need:

2 of these bendable corner connectors ~found here
RÄCKA Curtain rod corner connector IKEA Perfect to go around a corner or cover a bay window as it has a flexible gooseneck design.
2 of these shorter rods~found here

RÄCKA Curtain rod IKEA The length is adjustable.


1 of these longer rods~found here

HUGAD Curtain rod IKEA The length is adjustable.

and 4 of these brackets~ found here

BETYDLIG Wall/ceiling bracket IKEA

And there you have it, about a $25 bay window curtain rod.
You're welcome.

Giani Granite Counter tops round 2

Hey everyone, I hope you had a great week!  We are preparing for a busy weekend.  A visit with family, whom I haven't seen in years and a trip to the fair with new friends.  But I wanted to get these pictures up and talk to you about my counter tops. Many of you have been asking about them :)


A while back I was offered the chance to try out Giani Granite counter top paint.  My counter tops were less than ideal, you know that old fake butcher block look that was oh so popular in the early 80's.  So I decided to give it a try, nothing could be worse than what I already had, I had nothing to lose.  


The first time around went smoothly, you can see the before pictures and read about it here.  But after about a year or so, a few areas started to chip and peel.  Looking a little like this.

Sad.


Mostly in the heavily used areas only, and around the edges.  So I called the company and told them about my problem.  They were more than happy to send along a new kit including a more industrial top coat.  They were having problems with their old one, so they reformulated it and made it more durable.
 
And then, round two of painting my counter tops!  Good times....


Currently we do not have new counter tops in the budget, so this has been a satisfactory substitute for the real thing.

I accessed my creative spirit and tried my best to make this look something like marble.  And I believe I did pretty darn good job.  This is a cheap alternative for those of you out there with imperfect counters.  

 You can find the answers to any questions you have about this paint on their website.  And their facebook page has some great before/after photos.

Happy Weekend!!

Kitchen tour


About 2 years ago we finished our kitchen remodel.  I finally got around to styling it and taking some photos this weekend. 

Let's start with what you see when you walk in the back door.  This area is where we drop our bags, shoes and such.  The bench is a curbside find in my neighborhood.  I fixed it up and now it is a functional piece of furniture.


We had this shelf custom made and the hooks are from Hobby Lobby.


The cabinets are painted battenburg, walls are storm cloud grey,
 by Benjamin Moore.


 We worked very hard and on a ridiculously tight budget to create a kitchen we love.  Every thing together cost a little over $2,000.

Here is the before.
 Let's see a side by side comparison, shall we?


We had the bamboo flooring installed, but everything else was DIY.  You can find The glass cabinet tutorial here.

I painted our counter top (twice!) with Giani Granite Paint.  I will share more about that in another post this week.

I hope you all are having a great weekend!

Follow my blog with Bloglovin


Link Parties
Elizabeth and Co.

3rd Birthday

My middle child turns 3 on Thursday, but we decided to celebrate her birthday with a few friends over the weekend.  I think small birthdays for little ones is more ideal than a big blow out where they may feel overwhelmed. 


 I've never called myself a baker.  I usually get distracted while baking and leave something out, like butter in my last cake.
But this one turned out well.  I used Hershey’s perfectly chocolate cake and icing recipe.

I kept it very simple, a cake, some balloons and pizza. They danced, ran around the house and everyone was happy. 

A boy and a balloon, is there anything better?
Here's a tip that some of you may know about, but Dollar Tree has $1 balloons.  Those nice shiny types, that lasts for days.
The reason I tell you this is because last time I spent $15 for 12 regular latex balloons that wilted after one day. 
 
Hope you all are having a great week!