Sweet babies

A couple weeks ago we noticed something in one my brand new ferns I bought and hung on the front porch.

See that fern down there on the left?

Let's take a closer look, shall we?

And here they are as of yesterday.
This will usually kill my fern, because the mommy & daddy birdies go in and out of that thing about 200 times a day.  But I suppose it's worth it.  It's also an opportunity to teach my almost 3 year old about birdie life.

I can't believe she is almost 3.
Why? Why do they have to grow so fast?
I hate to admit that this baby is gone and never coming back.  But now I get to watch her grow into a beautiful young lady.  But I can wait.
Too bad the birdies can't say the same.

Tufted Chair

This lovely chair will be up for sale at The Little Red Barn Sale April 28-29.  If you live in the Atlanta, this is going to be a great artists sale.    Click on the red barn in my side bar for more info.

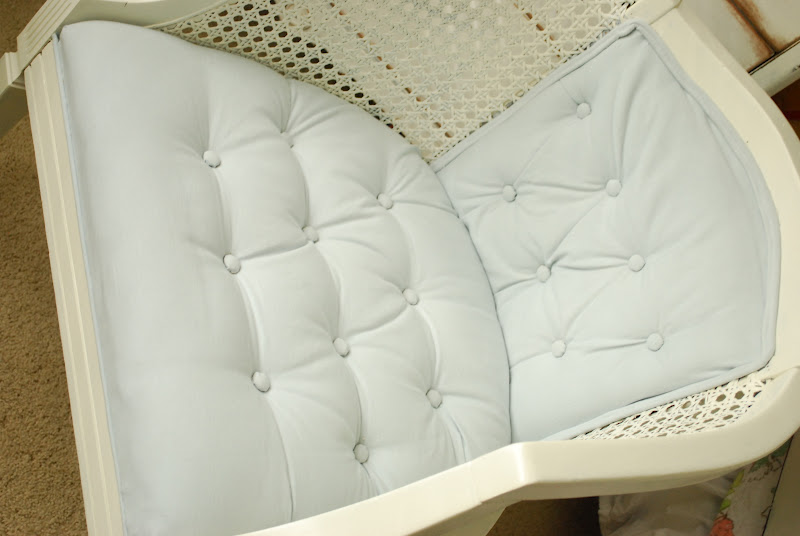
These little chairs, have become one of my favorite items to make over.  The chair usually starts out pretty ugly and gross, but by the time I finish, it's crisp, clean and beautiful.  This is my 3rd chair like this and by far my favorite.  
You can see my other two chairs here and here.

Here is the before
As you can see it has some button tufting on the seat and back cushion.  I had been wanting to try it out, and this chair was perfect for my first time.  Yes I admit, I was a tufting virgin.  But I just followed the exact way the old buttons were done and did it exactly the same with new fabric.  It was actually pretty easy.  If I had to do it from scratch, it would probably not have been.


 This was also my first time making the double cording on the back cushion  It is the perfect way to cover up all those ugly staples.
Crisp, clean, beautiful.

Link Parties
Primitive and Proper 
DIY Showoff 
Classy Clutter

Glass Cabinet Tutorial

Hope you all had a great Easter. We enjoyed spending time with family and hunting eggs.  It was the first time we got our girl a basket with goodies. She was in Heaven with the few candies she was allowed to eat.

So on to what some of you have been waiting for...
 This is by no means an exact way to put glass into your cabinets.  This is how WE did it.  I hope that this only helps serves as your inspiration and maybe a little guidance to do your own.
 *You will be needing some basic tools for this project.  If you're lucky enough to own a jigsaw and a drill then you're in business. If not, then maybe you could borrow or rent one.

We started out with a sturdy, solid wood cabinet with a rectangular trim.  I'm not sure how common this type of cabinet is, but you can take this tutorial and match it to fit the needs of your cabinet.  It shouldn't be that different.  For the full reveal click here

Here is what ours looked like
Step 1: We removed the trim which left a rectangle "shadow" of the shape.  If you don't have this trim "shadow" then you will have to measure where you want your glass to go.  I wanted our glass to fit right in the middle of the shadow, so when we put the trim back on, the glass would rest nicely in the shelf of the trim.
Then we drilled holes in all four corners of the rectangle shadow.

Step 2:  My husband measured/drew a line right down the middle of the "shadow" because we wanted to be sure to cut a straight line and then put the trim back on later.  Once the trim was back on there would be a little shelf for the glass to rest on when you turn it over.
Step 3: Cutting the door. My husband lined up the jigsaw into one of the holes pre-drilled in the corner.  These holes help  facilitate the jigsaw into your wood. Then he slowly cut on the line all around the rectangular shadow.
Step 4:  Once the rectangle hole was cut out.  We had to nail the old trim back on to it's original place.  This was a little difficult. 
Step 5:  I didn't get a pic of this.  But after we put the trim back on, I primed and painted the door.  Once it was dry I turned the cabinet over spread a thin layer of window glazing on the backside of the trim and placed the glass onto the little shelf created by the overlapping trim from the front. I pressed the glass gently all around and allowed to dry over night.  This is pretty heavy duty glue, but just to be sure we added a little bit more security on the back.  With some more nails.
We got our glass cut to size, by taking the actual cabinets up to Lowes and having them cut each piece to the size of the specific cabinet.  They were about $7 each.  I also spray painted all my hinges with oil rubbed bronze, all new pulls.
If you have any questions, please don't hesitate to ask!

Link Parties~
DIY Showoff 
Elizabeth &Co 
Fingerprints on the Fridge 
Reasons to Skip the Housework 

B&A Friday- PB inspried Table

Today I'm bringing you a great coffee table makeover from Cyndi over at 
She made a look alike Pottery Barn table from an roadside find!
I just love stories like this. 

Before


After


Here is the Pottery Barn Version
Pretty good, huh?  Thanks Cyndi for your awesome transformation!
Click on over to her blog to see haw she did it.

~
 If you would like to be considered for B&A Friday please send your pictures to me
I would love to showcase your before and after photos of furniture, rooms or re-purposed items.

Betweenblueandyellow@yahoo.com

Spring!

This has been a fantastic Spring.  I've been quite busy with life, and I'm so grateful for all the opportunities coming my way.  But sometimes I can't help but think of those who are struggling right now to find work and losing their homes.  I just finished a great book called The Girls Guide to Homelessness.  It is an autobiography about a girl who becomes homeless through various circumstances and starts a blog about it.  I could not put the book down.  She tells quite a compelling story.  Check it out.

Any who...

Some of the things keeping me busy during this beautiful transition of seasons.

Taking in every possible sweet moment of this girl
And of course this girl


Sprucing up our front porch for summertime relaxin'

I never thought I could get so excited about a plant.  This is my hydrangea, and it's first teeny, tiny blooms. I planted it two summers ago, and since then I've hoped that it will finally decide to show me some love.  Sometimes I would cry myself to sleep at night, wondering what the problem might be.  I guess these plants just wait until they are good and ready to bloom.
Hope you are having a great Tuesday afternoon.  I'm off to work on some more projects for the Barn Sale!

Chair Set & a lesson

**Reminder to those who live in the Atlanta area**
April 28-29
10-4
473 N Peachtree St.
                                                                    Norcross, GA 30071
I'm getting really pumped for the weekend of the 28-29.  I can't wait to gather with a group of talented women who have come together with their special creations to share with others.  
On a side note, something I've been thinking about since it happened.  I almost hit two kids in the Whole Food parking lot today, because they ran right out into oncoming traffic with out even stopping or looking!  I screeched to a halt, and they didn't even seem to notice me.  I sat there stunned wondering where the parent was.  And then I saw him about 20 feet away walking casually ON HIS CELL PHONE!  I can not begin to tell you how mad I was.  I rolled down my window and hollered at it him " Are those your kids?!"  " Yes" he says.  "They just ran off."  Like that was a justified explanation.  I was stunned, I said "I almost hit them!"  He walks to his kids, still on his cell phone mind you, and says "Did you see that car, say your sorry."  And they did.  I hope that wasn't the end of the conversation.  Please, please, please if you are reading this and you have kids I urge you to teach them, if you haven't already, the right way to cross the street.  And for goodness sake get off your phone and pay attention.

Moving on.....

This set of 4 beautiful chairs will be among the items for sale
Before-
There are 3 of these


 And one of these. I call it the "Daddy chair"

I hope to see you there!

Primitive and Proper

Kitchen Update-Glass Cabinets!

Update: Click here for the  *Glass Cabinet Tutorial**

So far this has been my 2nd kitchen update.  It has taken about a month to get to this point, and we still have a long way to go.  We have decided to get dark bamboo floors installed eventually.  But I'm SO happy to announce that we hung the final glass cabinet last night around 9:30pm.  And I could not be more thrilled with the result.  I've had this vision for my kitchen since the day we moved in almost 5 years ago, and it's finally starting to look just like I pictured in my head.  The first project we completed was painting the counter tops with Giani Granite Paint. The second was the new faucet . And now I can add glass cabinets to the list!


For those who have forgotten what we started with.  Honey colored cabinets, fake butcher block counters.
and still existing linoleum flooring.
Here is a side by side comparison of the same spaces before and after.
We decided not to put pulls on the top, just because I think it looks better with out so many knobs and such.  Plus with 50 cabinets, it was starting to get pretty expen$ive.


And a couple more just for fun.
Although I love the green color, it just doesn't seem to go.  So I will be painting it.
Click here for my kitchen paint colors.
We accidentally cut one of the wrong cabinets, whoops!  So I will be able to share the other side of the kitchen once we fix that.

Glass Cabinet Sneak Peek

The thing I'm most excited about with this whole kitchen reno, is the glass cabinets.  We are doing it ourselves and I promise to write up a complete how to when we are finished.  It's the last thing to do as far as the cabinets go, but we still have the floors to replace. That will be a while. Boooo....

Here is a before and after of the same area

Only have 6 more to hang.  I got so burned out painting my 50 cabinets, that we've been taking it easy the past couple weekends.
Really enjoying the Spring weather, although this pollen is starting to become a nuisance.

Be Inspired: Bring Spring Indoors

One of my very favorite things about Springtime is the free flowers.  Like most people, I love to have fresh flowers hanging around the house on a regular basis.  But it can be expensive.  So now I can just go outside with my scissors, and with a quick snip snip I have a beautiful bouquet.
Thankfully we didn't have much of a winter this year.  It's no secret that I hate it.  Sorry Winter, but you and I just don't get along and you know it.
 

I hope you are feeling the Spring weather where you live. If not don't worry, it will be there soon!

Kitchen progress photos coming soon...

Chalk Paint Buffet

Here is the one of the pieces of furniture I will be selling at The Little Red Barn sale
It could be used as a buffet, TV console or I thought it would look cute as a linen cabinet.
It has 2 glass shelves inside.
I made my own chalk paint by combining water with no sand grout.  I did not measure it but just added water until I got the right consistency I wanted.  Then I added equal amount of paint.  It turned out well, and sanded really well.