New Project

Over the weekend we finally started on the next big project for our house, the basement.  Thankfully when we moved in it was already finished.  Just had old yucky carpet, that we pulled up, and a bit of a moisture problem.  But we now have a dehumidifier running constantly and it makes a big difference. 
I plan to document our progress, and post pictures as we finish certain tasks.  We plan to paint the floor, which is going to take a loooong time.  Because first we have to clean it,  this is going to be quite a process.  It has glue from the carpet and lots of white paint splattered all over.  I have a vision for it though, and I know it's going to turn out great!

Here's what it looks like currently
 Several pieces of my furniture waiting their turn to be refinished.
Big ole' mess!
But soon to be a great place to play and relax.

B&A Friday

This week I'm featuring a reader's DIY before and after project of her built in dining room cabinet.  As well as a little project of my own with some thrift store wooden trays.
 
Here is Amanda's project

Pretty crazy the difference right?
I can't tell if it's real wood or not, but whatever it is she did a great job covering it up with some white paint.
She's also working on her kitchen cabinets, looking forward to seeing those pictures!

And now onto my sweet little project from the other day.
I saw these awesomely painted trays underneath some rubble at my local thrift store.  I'll admit I didn't initially see their potential, but I looked deep inside and saw they could be more than what some little girl thought was good Christmas decoration.  Sorry Becky Gordon 2005, but your cute little tray is no more.

Needless to say , this is the before

 I'm really into burlap and Mod Podge these days, can you tell?
I allowed some of the original white snowflakes that Becky so artfully dotted around the edges, to peak through.  Just for sentiments sake.

The Winner of the Chalkboard!

I'm so excited to announce the winner of my very first give away, 
drum roll please.......
The winner is Tracie!
I used Random.org, but I couldn't figure out how to save the image of the number, but trust me when I say the number was 6 out of 33 comments,
Thank you all SO much for entering I wish I could make chalkboards for you all, but that would take a lot of time, effort, money etc.
 
Tracie said...
I am already a follower.... I love to decorate and read several blogs each day! I love this chalkboard and hope I win! Thanks for the opportunity! :)

Salt and Pepper Shakers

Since it's been a bit cold and rainy here, I haven't done much with my furniture.  I've been getting in touch with my crafty side, which I never knew I had much of.  But as it turns out, I think I'm a little bit crafty.  So here's what I did with some thrift store salt and pepper shakers.
I took some Mod Podge, burlap, and this cool black paper I also found at the thrift store and wrapped them around the shakers.

Also did something with this little tray they are sitting on, will show that tomorrow.
giveaways

Easy Squash Casserole

This Thanksgiving I contributed my squash casserole to the vast array of side dishes.  It went very quickly, that's how good it is.  It's such a simple, easy recipe that I know you will love, even if you don't like squash.

Ingredients~
5-6 med size yellow squash
1 large onion
1 brick  shredded cheddar cheese
3 eggs beaten
1 1/2 c  seasoned croutons (crushed)
salt & pepper

Preheat your oven to 400
Slice and steam your squash and onion.  I use a steamer basket on the stove top, steam until just tender. Meanwhile, put the croutons in a bag and pound them with a mallet until crumbs form.
When squash and onion are done, place them in the bottom of your baking dish  . Add your beaten eggs along with some salt and pepper into the dish with the squash.  Blend together, then add the shredded cheese on top along with the crushed croutons.
Bake at 400 for 25 min or until cheese is bubbly.
Enjoy!

Crib Bumper

 I finally finished the crib bumper for K's baby.  I think it turned out pretty good for my first real attempt at sewing.  
Here is the final product

This was a great gift for her.  She was unable to find a pre-made bumper she liked, so I offered to make one out of a fabric she chose.  I bought a pattern and just followed the directions.  It was a little difficult, since I don't know all the sewing lingo.  But overall, pretty easy.  If you don't mind sewing, I highly recommend doing this for anyone you know who is about to have a baby and is in the same predicament.
It looks so cute next to the green walls, that K perfectly matched to the green in the fabric.
 So excited to meet this little guy who will sleep with this bumper I made just for him!

*Don't forget to enter the Give Away for the chalk board*

1st Give Away!

What a wonderful holiday weekend, we ventured up to SC for the holiday and spent it visiting with my mother in law's very large family.  They have a tradition each year to roast a pig, and everyone brings a dish.  It was very gratifying to be around a group of such genuinely sweet people. I hope you all had a great Thanksgiving as well, now on to the give away.
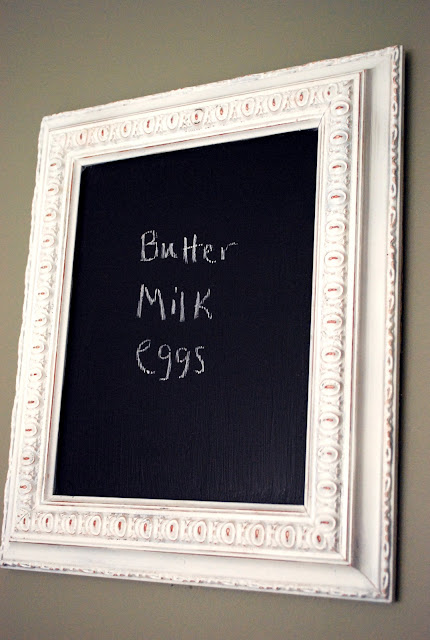
I really wanted to make something for the winner, so I decided to go with a cute chalk board.
This would be perfect for your home. It could be used for to-do lists, jot down a number or give someone a message.  I 'm just so thankful for all of your support and kindness over these past few months, I really wanted something I made to go in one of your homes.


White frame size 13 1/2 X 11 1/2

Here are the rules~ If you want to win.
1). Please become a follower/subscriber first.
2). Leave me a comment telling me your name and one thing about yourself.
3). If you don't have a blog or a Google account, leave a comment and send me a message with your e-mail.
4). Also make sure you read this, I don't want a winner I can't get in touch with!

*Give away ends Thursday I will announce the winner Friday*

Thank you Give Away

 I wanted to thank you all for being such a constant support in this new endeavor I have taken on.  I had never thought of blogging in my life, or refinishing furniture for that matter.  
But today I reached 200 followers and I couldn't be happier.  I have loved getting to know some of you, albeit through e-mail, but nevertheless I feel like I know a part of who some of you are.  I read all of your comments and try my best to reply.  But I wanted you to know why I sometimes don't.


Chris said it best over at Just a Girl ~

"Can I make a suggestion/plea/beg for mercy/down-on-my-knees proposition?
In an effort to save time, I check all my comments via my e-mail. Unfortunately, many comments leave me with that “no reply blogger blah, blah, blah” stuff.  UGH!  I can’t get back with you that way!  Here’s what you can do!

1.  Go to your blog and click on “customize”
2.  Click on “dashboard” in the upper right hand corner.
3.  Next to your profile picture, click on “Edit profile”
4.  Under privacy, click “show my e-mail”  Under identity, make sure the public e-mail address you use is there.
5.  Save
Now I can reply to your comments much easier and much more efficiently!  Thanks!"


In other news, I thought I'd thank you by doing my first ever GIVE AWAY!
I'm not sure yet what I will be giving away, but I will think of it over the next few days and get back with you on Monday!!
I'm taking the holiday off, so I hope you all have a Happy Thanksgiving :)

Love ya mean it~
Kathleen 


Burlap Vase How to

I saw this great idea from Cassie over at  Hi Sugarplum!  She copied a $50 burlap wrapped vase from Ballard. When I saw her post I immediately wanted to give it a try on my own.  However, I did it a little differently.
I got the vase from the dollar store and another small one.  
 First, I Cut out each piece of burlap to fit perfectly around my vase. Then I used a lighter to gently burn off the tiny "hairs" on the edges.

 Where Cassie used glue, I tried Mod Podge.  I slathered on a thick layer of the stuff all over the burlap piece, then carefully wrapped it around the vase.  The Mod Podge made it a bit stiffer and more fitted to the vase.
 Then I allowed to dry for about 30 min.
And......
First the Ballard version
And mine!
The burlap adds great texture to any decor.

http://madincrafts.blogspot.com/2010/11/mad-skills-30.html

Cabinet Re-Do

Yet another turquoise piece.  Have I mentioned how much I love this color?  I mixed up my own paint color  again, so I'm sorry to say I won't be able to give you specifics.  It was three different colors of oops paint and one of them doesn't even have a name.  But it was a dark green, a pale gray and a rich blue gray.  I mixed and mixed until I got this fantastic rich turquoise color.  It took me a couple tries, but I finally got it right!  As of right now I will be keeping this piece, but things change.

Remember this little guy?
Although he was in pretty good shape, just needed to be updated into the 2010's.
 Now he greets me as I walk up my stairs.
Since I plan on keeping this one, I heavily distressed it.  I don't usually because I'm not sure many people like that look.  But I do!
I stripped and stained the top dark, primed the bottom with oil based primer.  I tinted my primer with green because I knew I wanted to to show through later, and I didn't want it to be bright white.  Then I painted it with the turquoise.  I used my sander to heavily distress it and then went over it all with a dark walnut stain.

Me likey :)
(These pictures don't do it justice, my hallway is dark and I had to rely on a overhead light )

Link parties
http://www.storiesofahouse.com/2010/11/project-diaries-volume-9.html
http://betweennapsontheporch.blogspot.com/2010/11/pottery-barn-ornament-pine-garland-hack.html